Category: Network & Server (網絡及服務器)

vCloud Usage Meter

By admin, May 8, 2011 2:37 pm

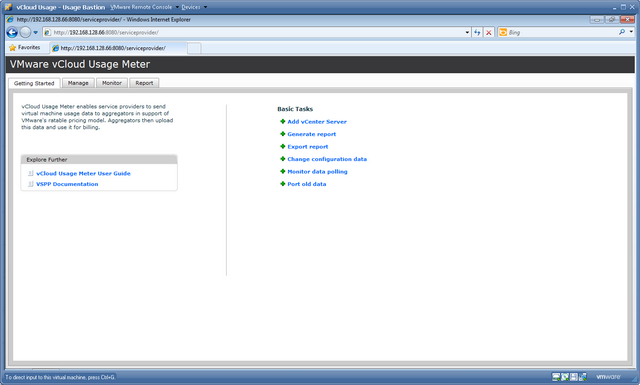
The installation of vCloud Usage Meter OVF Appliance is very easy, just remember to assign its network NIC to your vCenter subnet and then browse to http://vCloudUsageMeter:8080/serviceprovider, add vCenter and configure all the email settings.

I found vCloud Usage Meter is very useful even you are not using vCloud Director, it serves as a good measurement of your virtual infrastructure and you can generate reports to have a better understanding of your VM usage, best of all, it’s a free!

vum

Free Tools from VKernel

By admin, May 4, 2011 4:52 pm

It seemed the market for 3rd party virtualization tools is really heating up, this time it’s VKernel offers some free apps for those who love every bites of those nice looking GUI based tools.

  • ApplicationVIEW
  • CapacityVIEW
  • StorageVIEW
  • Capacity Modeler 

I’ve tried them all, well, it does what it suppose to, which is just to give you a very preliminary of what your current virtual infrastructure is and also present you some problems it discovered, to get into more details, you have to pay as expected. Well, to some extend, I don’t like VKernel’s free tools, as they are really does nothing but to get you into buying their products, by contract, Veeam is doing much better for the free products that’s actually useful, so I’ve uninstalled all 4 after 30 mins of testing as I found they are really not useful at all.

A few years back, I was seriously consider buying VMkernel’s chargeback product as it’s more advanced than VMware’s chargeback product, but both contains flaw and drawbacks. After almost 3 years, I still don’t see anyone on the market offers a good cloud based chargeback/billing panel for easy to use and customize to individual company’s requirement, if you know any new comer, please drop me a line, thanks.

Problem: Untangle 8.1 OVF and ESX 4.1 in Transparent Mode

By admin, April 29, 2011 2:55 pm

I’ve read the Wiki page for installing OVF on ESX and failed once already because I bridged the vNICs on the same vSwitch without using VLAN, so eventually I crashed my network as looping started to occur.

So this is my second attemp, please refer to the picture I’ve attached, hope you can give me some advice and suggestions.

1. So basically, I have ONE vSwitch with TWO physical NICs binded together to have Load balancing and failover.

2. Within, I have THREE Port Groups:
- External (no VLAN) connects to Internet
- Untangle DMZ (VLAN 21) – Useless as I will use Transparent Mode
- Untangle Internal (VLAN 22) – where I put VMs that I want to protect behind the Untangle.

Is the following concept correct?
1. When I use Untangle in Bridge or Transparent Mode, I will ONLY utlilize two interfaces External (no VLAN) and Untangle Internal (VLAN 22), so these are the two vNICs Untangle VM will connect to. This leaves Untangle DMZ useless, so I can remove it from VMX or VM configuraiton GUI?

2. I Understand I need to enable Promiscuous Mode in order to have Untangle to scan the network in transparent mode (ie, a sniffer that is), (side topic: Do I need to have Promiscuous Mode if I am using Route Mode?)

I understand I need to enable Promiscuous Mode on Virtual Switch Level (ie, toppest level), which I DON’T WANT to due to security reasons (ie, VM behind Untangle can sniff the whole network right?), Can I enable Promiscuous Mode in individual Port Group Instead?

If Yes, the ONLY Port Group need to have Promiscuous Mode enabled is Untangle Internal (VLAN 22) right? Where it is the Port Group all the VMs are going to connect to. I do not need to enable Promiscuous Mode in External (No VLAN), is this correct?

Or I HAVE TO ENABLE IT on vSwitch level? but why? I thought individual Port Group will OVERWRITE the default setting, NO?

But wait, no matter where I enabled the Promiscuous Mode (ie, vSwitch level or Port Group level), the risk is still here, can I say I am allowing all the VM to have the capability to sniff traffic on the network? If yes, this is absolutely NO GOOD in using Untangle as enabling Promiscuous Mode will open a big security hole in L2 (ie, enabling Promiscuous Mode will render my switch to a hub)

3. FYI, the TWO PHYSICAL NICs (ie, vmnic8 and vmnic0) are connected to the same physcial L2 switch. VLAN 21 AND VLAN22 have been configured on this physical switch as well, also VMware VST VLAN tagging is used on the Port Group. I wonder if my current configuration will STILL create a loop that will crash my network again? (I don’t see how it can, but really want to double make sure and confirm with you guys)

4. Where is the management interface for Untangle going to be in this case? Do I need to create a new port group say Untangle – Management VLAN 23, and also add a new vNIC (probably just use the one for DMZ) and then connect to this Untangle – Management port group.

untangle[1]

Update May-1-2011

Now I understood Port Group with VLAN VST Mode won’t work with Untangle and confirmed again with what’s on the Wiki, the document said it clearly “Each vSwitch should be connected to it’s own Physical NIC, or at least be separated by VLAN tagging at the physical NIC level. ” (ie, on the Physical NIC level and the picture attached above also confirmed this).

So does this mean Promiscuous Mode for bridge mode can ONLY work on Virtual Switch Level, but not Port Group Level?

Um…it’s quite disapointed as I gradually found out Untangle on ESX has so many limitation (ie, no VLAN tagging, must enable Promiscuous Mode for vNic connecting VMs, must have Promiscuous Mode on vSwitch but not on Port Group).

So I have decided to use Route Mode now to aovid the above limitation now.

Since I don’t have any more physical NIC to spare, can I create an internal vSwitch (ie, WITHOUT NIC) for Untangle VM ?

ie, External > Untangle External > Untangle Internal (which is on the internal vSwitch without NIC) and all the VM will be on this same internal vSwitch, which will be all protected by Untangle that is.

This will work right? Anyone Please?


Update May-19-2011

Finally, I’ve got Untangle 8.1 OVF working under ESX 4.1 in route mode, the solution is very simple:

1. Simply remove the last NIC in VM configuration, this will get rid of the DMZ NIC, leaving only External and Internal NICs. These two NICs are exactly what Route Mode requires.

2. Assign External NIC to your external connectivity to the Internet, and Internal to a seperate Port Group (in my case it’s VLAN 20 – Untangle)

3. Reboot Untangle, now, you won’t be able to use the default admin/passwd to login, it’s ok, just reset it, after successfully login to the console, configure the statics IP for both External and Internal.

That’s all you need, simple and neat! and I am really starting to fall in love with Untangle’s GUI, they do look so much cooler than my dull Netscreen’s GUI.
100% VM CPU in ESX Performance Tab but Task Manager Shows None

By admin, April 24, 2011 11:23 am

Yesterday, I tried the cpuid.coresPerSocket setting on a testing W2K3 Web Edition VM (plain install, no SP), I set cpuid.coresPerSocket = 4 with 8 vCPUs and I was able to boost the VM to 8 CPUs in task manager (ie, 2 sockets with 4 cores on each sockets), then I remove the cpuid.coresPerSocket parameter from .vmx and reduce the vCPU to 1, problem started to occur after reboot the VM.

Veeam Monitor and ESX Performance Tab started to show CPU over usage alarm and CPU stayed at 100% no matter what, I even remove the VM from Inventory as added it back again as I though it may solved the problem, nothing worked until I found VMware KB1077.

However there is no option in Device Manager > Upgrade Computer HAL to change from Multiprocess HAL to Uniprocessor HAL prior W2K3 SP2, I do have a little program to do it, but I forgot where I put it, so I simply upgrade the VM to SP2 and all the problem disappear after reboot.

I don’t think this will occur in W2K8, probably only happen in old OS like W2K, W2K3 prior SP2, so all you need to do is to select the correct processor HAL for your VM.

What’s New in vSphere 5.0

By admin, April 22, 2011 11:14 am

Content has been removed by the request of VMware on Apr. 28, 2011.

How to get ESX MPIO working on StardWind iSCSI SAN

By admin, April 21, 2011 10:23 pm

Anton (CTO of Starwind) gave me a great gift last night (StarWind v5.6 Ent), thanks!  I couldn’t wait to set it up and do some tests on this latest toy!

The setup is very easy, took me less than 5 mins, probably I’ve installed the previous v4.x back in 2009, but setup according to my own taste is a bit tricky as you need to tweak starwind.cfg and understand the first few parameters especially under the <Connection> section.

It took me 1 hours to get everything working (ie, ESX MPIO+Starwind) as I want to limit the NICs to only iSCSI subnet, as well as change the default iSCSI port to 3268. Yes, sure you can use a non-default port as 3268, as my 3260 is occupied by Microsoft’s iSCSI Target 3.3. I found the default installation also opens the management and iSCSI port 3261/3260 to public in firewall, you definitely want to disable it and limit the NIC access in StarWind management console as well the .cfg file.

So I have configured two Gbit NICs on WindStar box,

10.0.8.2:3268
10.0.8.3:3268

On each of the ESX Host there are 4 Gbit NICs on iSCSI subnet, I added one of the target IP 10.0.8.2:3268, then I found ONLY 4 MPIO Paths discovered, but not the 8 paths, all 4 were using the 10.0.8.2 path, this mean the other redundant path 10.0.8.3:3268 was not being used at all, so MPIO was not working technically specking. On contrast, Microsoft iSCSI Target will add the other one 10.0.8.3:3268 automatically, so it correctly shows 8 Paths.

After searching Starwind forum with Google (yes, use that site: command, so powerful), I quickly located the problem is within starwind.cfg

You can do normal ESX multipathing in Starwind without the HA cluster feature of Starwind 5, just follow the instructions for configuring Starwind to work with XEN and uncomment the <iScsiDiscoveryListInterfaces value=”1″/> line in the starwind.cfg file. This allows ESX to see all the possible paths to the iSCSI target on the server.

After enabled it, and restarted the StarWind service, Bingo! Everything worked as expected! 8 MPIO paths showing Active (I/O). This tweak does work for ESX as well not just Xen, and in fact it’s a MUST to enable it in order to see all paths.

So within the last 3 days, I was able to added two software iSCSI SAN to my VMware environment together with Equallogic, now I virtually have three SANs to play with, I will try to test Storage vMotion between all 3 SANs and perform some interesting benchmarking on StarWind as well as Microsoft iSCSI Target.

Later, I will try to configure the StarWind HA mode on VM (which is hosted on Equallogic), so it’s an iSCSI SAN within another iSCSI SAN. :)

Equallogic PS Series Firmware Version V5.0.5 Released

By admin, April 21, 2011 4:02 pm

As usual, I would wait at least 1 month before taking the firmware update, probably not to update the firmware at all as none of the following  issues occur to me.

Issues Corrected in this version (v5.0.5) are described below:

In rare cases, a failing drive in a array may not be correctly marked as failed. When this occurs, the system is unable to complete other I/O operations on group volumes until the drive is removed. This error affects PS3000, PS4000, PS5000X, PS5000XV, PS5500, PS6000, PS6010, PS6500, and PS6510 arrays running Version 5.0 of the PS Series Firmware.

I thought this has been fixed in v5.0.4 where the fix list indicates Drives may be incorrectly marked as failed. So this basically means a supposed failed drive is marked as health, but a healthy drive is marked as failed, wow, interesting! :)

• A resource used by an internal process during the creation of new volumes may be exhausted, causing the process to restart.

• If an array at the primary site in a volume replication relationship is restarted while the replication of the volume is paused, resuming replication could cause an internal process to restart at the secondary site.

• A resource used by the network management process could be exhausted causing slow GUI response.

• Volume login requests in clustered host environments could timeout resulting in the inability of some hosts to connect to the shared volume.

• A management process could restart while attempting to delete a local replica snapshot of a volume, resulting in slow array response at the primary site for that volume.

• When a management process is restarted, or a member array is restarted, a volume that is administratively offline could be brought online.

• If a member of the secondary site restarts while a volume replication is active, the group at the primary site could continue to report that the secondary site group is offline after the secondary site member is back online.

How to Extend VM partition under Linux (CentOS)

By admin, April 21, 2011 8:12 am

I often extend partition live (without downtime) for Windows VM using either diskpart or extpart from Dell, but extending partition under Linux is a totally different thing, it’s a bit complex if you are from Windows world.

  1. Increase the disk from vCenter GUI, reboot the server. (Take a Snapshot)
  2. ls -al /dev/sda* to find out the last created partition, sda2 is the one in my case
  3. fdisk /dev/sda type n for new partition, then p and 3 for the partition number (ie, sda3), then accept all the default first and last cylinders and finally w to complete the partition creation, then finish with reboot.
  4. pvcreate /dev/sda3 create a new Physical Volume
  5. vgextend VolGroup00 /dev/sda3 add this new volume to default Volume Group VolGroup00.
    (Note: vgextend cl /dev/sda3 in CentOS 7)
  6. vgdisplay to show the FREE PE (size of the free disk space), lvdisplay to show the volume name.
  7. Extend the volume by lvextend -L +XXG /dev/VolGroup00/LogVol00, you can find out the exact path of the default Logical Volume by lvdisplay. (ie, lvextend -L +20G…)
    (Note: lvextend -L +XXG /dev/cl/root in CentOS 7)
  8. Resize the file system by resize2fs /dev/VolGroup00/LogVol00 to complete the whole process. (If everything works, remove the Snapshot)

Update: May 15, 2017
For CentOS 7 , use xfs_growfs /dev/cl/root as it’s use XFS file system instead of the traditional ext3/4 based file systems, also Group and volume name have been changed to cl (was VolGroup00) and root (was VolGroup00).

Reset and update a Dead DRAC III on Poweredge 2650 in CentOS enviornment

By admin, April 20, 2011 5:08 pm

RMC Webserver 2.0: error 304 occured

The  above is the error message when you tried to connect to DRAC III Web UI on Poweredge 2650, the old DRAC isn’t very stable, it just crashed without any reason from time to time.

To reset it the method is quite simple, you need to install Dell OpenManage 5.5 on CentOS, then issue the following command and wait 30 seconds before login again.

> racadm racreset

Btw, you can view  DRAC’s information by

> acadm getsysinfo

RAC Information:
RAC Date/Time         = Wed, 20 Apr 2011 16:54:27 GMT+08:00
Firmware Version      = 3.37 (Build 08.13)
Firmware Updated      =
Hardware Version      = A04
Current IP Address    = 10.0.0.22
Current IP Gateway    = 10.0.0.2
Current IP Netmask    = 255.255.255.0
DHCP enabled          = FALSE
Current DNS Server 1  =
Current DNS Server 2  =
DNS Servers from DHCP = FALSE
PCMCIA Card Info      = N/A

System Information:
System ID    = 0121h
System Model = PowerEdge 2650
BIOS Version = A21
Asset Tag    =
Service Tag  = XXXXXXXX
Hostname     =
OS name      = Linux 2.6.18-92.el5
ESM Version  = 3.37

Watchdog Information:
Recovery Action         = No Action�
Present countdown value = 0
Initial countdown value = 6553

RAC Firmware Status Flags:
Global Reset Pending Flag = 0

Since the DRAC III Firmware Version 3.37 (Build 08.13) is quite old, I want to update it to the latest 3.38, A00 (the release note said it has fixed remote console bug, so worth the update), all you need is download the harddisk version and extra it firmimg.bm1 to your TFTP root, then login to DRAC again and select the Update tap, upload and the firmware and wait a few minute to complete the whole update.

“The operation is not supported on the object” encountered when deploy VM from Template.

By admin, April 19, 2011 2:55 pm

Today, when I deploy a CentOS VM from Template, I’ve encountered an error:

Reconfigure virtual machine Status showing “The operation is not supported on the object”

Googled around and find nothing, then I realized it’s probably something to do with the hardware configuration. I checked the vmfs configuration file and found ddb.adapterType = “lsilogic”, after remove it, everything is back to normal, of course, I’ve updated my template as well. It’s due to the CentOS template VM Disk Controller has been changed and the old configuration was still kept somehow.

I also discover deploy a Linux VM somehow will add new a NIC, the solution is to remove the nic.bak, and reconfigure the IP on the new eth0.

Update Jun-21-2011

I’ve encountered the same problem today when deploy from a w2k8r2 template, the annoying alert simply won’t go away. Luckily, I’ve found out the solution by trial and error. Simply convert the Template to VM, then to Template solved the problem completely. I suspect this is a bug in ESX 4.1, the original template was Cloned from the running VM, may be that’s why!


Pages: Prev 1 2 3 4 5 6 7 ...20 21 22 ...26 27 28 Next