Category: Equallogic & VMWare (虛擬化技術)

My First Encounter with Xangati for ESX

By admin, April 6, 2011 12:57 pm

1

Xangati for ESX (Free Edition) is always ranked as one of the top 10 Free ESX Appliances. I finally got time to test it although not very successful, the following is my findings. 

  • Xangati called its product a management tool for ESX, in fact, it is really a packet sniffer built on Linux CentOS like Wireshark or Ethereal and on top it combines the ESX monitoring capability like Veeam Monitor or Vizioncore’s vfoglight.
  • Documentation for Xangati for ESX (Free Edition) is too simple, although you will find two video on Youtube that showing how to setup Xangati, but there is FAQ or community help (There is a community, but it’s really an one way Xangati board)
  • Importing OVF into ESX is straight forward, but after starting up the VM, I encountered a problem that the screen showing blank with only X cursor moving, hence, I have no way to open GUI and continue to installation. There was a error in VM event showing my video ram is not big enough, so I’ve increased it to 16MB and the problem continues, quitting the session, I found VM console was showing some kind of JAVA error, I guess there is something wrong with JAVA that prevents the GUI (or JAVA) console to be shown. Finally, I’ve also tried to re-deploy the OVF as thick as thin format may cause the reason, but it still showing blank screen anyway
  • After google a bit, again I was lucky to find a PDF that showing a bit more details for the installation, although it’s for Xangati Dashboard, within I was able to locate the username “setupip”, but where is the password? So I used the same username as password, ok, I got in and successfully configured my Network, DNS, Time Zone, etc. Btw, I’ve sent an email to support@xangati.com regarding the blank screen originally, but still got no reply after 24 hours.
  • After connected to the configured Xangati appliance via browser and login as admin, I was able to pull some traffic across my internal ESX host and management IP range. Then I figured out the Free Version can only support 10 IP devices and most importantly, it doesn’t support vCenter, but only 1 ESX Host although I’ve already configured my vCenter IP and tested the connection is valid (no warning in that step), so I’ve changed the vCenter IP to a ESX Host IP and removed all the discovered devices and let the appliance run for 5 minutes, later it just show the traffic for the ESX host and not the VM within, so what’s the point after all?
  • The biggest draw back is there is no where mentioning in that 4 page quick installation guide which network portgroup should we connect Xangati VM to. To my instinct, I just use the Service Console portgroup network segment, as it’s where most these kind of monitoring tools works, like Veeam Monitor and Vizoncore vfoglight. However, why there is no VM showing up? I don’t know.
  • Veeam Monitor and Vizoncore vfoglight are not appliance based, but application based software instead but they can also provide almost exactly the same feature for showing exactly what’s going on each ESX Host as well as individual VM. Yes, they do not provide any insight into traffic pattern, such as how much WWW is going though at the moment, as well as Email traffic etc. However since I am using PRTG’s packet monitoring that can directly connect into the external switch’s mirror port and monitor all the incoming/outgoing traffic from there, so I don’t really need this feature with Xangati. Last time, this great feature allows me to quickly identify a server IP that’s sending 100Mbps outgoing DDOS via UDP protocol using an encrypted PHP script, which was uploaded by hacker to a client’s web site through it’s ASP upload security hole.
  • Finally, the UI of Xangati is not eye catching and easy to use as the Veeam Monitor or Vizoncore vfoglight, combining with installation and the rest, I think it’s potentially a great product, but still has a long way to catch up.
ESX VLAN Configuration: VST Mode 802.1q

By admin, April 4, 2011 10:21 pm

netgear

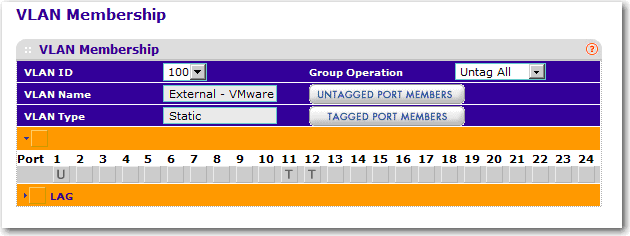
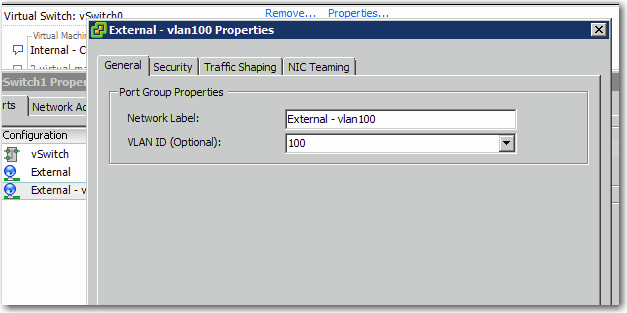
Recently, I tried to configure vSphere VLAN 802.1q VST Mode with external Netgear switch. On Netgear side, VLAN (ID=10) was set correctly on ports by using Tagged Port (ie, 802.1q), the same VLAN ID is also assigned to ESX Portgroup, but the connected VMs couldn’t visit the outside Internet.

I did a simple test by giving a private IP 10.0.18.10 to VM1 on ESX Host 1 which is on vlan 10, then I did the same for VM2 on ESX Host 2 which is also on vlan 10.

Guess what? They can ping each other!

To future prove my original Netgear VLAN setting is correct, I did the following tests as well:

Test 1. Change vlan 10 to vlan 20 on ESX Host 1, now VM1 cannot ping VM2, so original VLAN tagging or 802.1q is working!

Test 2. Change Netgear Port 11 & Port 12 (both on ESX Host 1) to Untag, now VM1 cannot ping VM2, so original VLAN tagging or 802.1q is working indeed!

portgroup

After researching for several days, I found the following, BINGO!

For example, consider the organization whose servers plug into distribution layer switches. These distribution layer switches then connect to a core switch. If the connections between the core switch and the distribution switch are not already configured as VLAN trunks, i.e., are capable of carrying multiple VLANs simultaneously, then using VST is impossible. Each of the distribution switches only carries a single VLAN and is only capable of carrying a single VLAN.

I thought I don’t need to get my Netgear to talk to data center’s core switch in order to have ESX VST working, this is exactly I was wrong! After talking to my data center, I got it working finally, but I still decided not to use VLAN (VST mode) on public IP addresses as it doesn’t provide real benefits and ESX Portgroup won’t allow traffic sniffer anyway, so it’s pretty secure, rather I found a private or local 802.1q VLAN is more useful say to configure a Private LAN between VMs (sometimes, you need a private LAN for backup)

Different Methods to Get ESX Host Hardware Alerts via Email

By admin, March 23, 2011 12:59 pm

Basically, there are 3 methods to get instant email alert via email by using VMware vCenter, Dell iDRAC and Dell IT Assistant (ITA) which I will focus the most, 2 of them are specific to Dell Poweredge Serer and ITA solution.

Method 1: How to get hardware failure alert with vCenter

This is the easiest but you do need to have vCenter, so it may not be a viable solution for those using free ESXi (there are scripts to get alert for free ESXi, but it’s not the content of today’s topic).

From the top of the hierarchy in vCenter, click Alarms, then New Alarm, give it a name say “Host Hardware Health Monitor”, in Triggers, Add, select “Hardware Health Changed” under Event and “Warning” for Status, Add another one with the same parameter except “Alert” for Status. Finally, for Actions, choose “Send a notification email” under Action and put your email address there.

Of course, you need to configure SMTP setting in vCenter Server Settings first.

Method 2: How to get hardware failure alert with Dell iDRAC

This is probably is even more simple than the above, but it does not report all of the hardware failure in ESX Host, so far I can say it doesn’t report harddisk failure which is very critical for many, so I would call this is a half working or a handicapped solution.

Login to iDRAC, under Alerts, setup Email Alerts and SMTP server, you will need to setup a SMTP server on your dedicated DRAC network to receive such alerts and forward those email alert to your main email server on external. Under Platform Events, you need to CHECK Enable Platform Events Filter Alerts and leave all the default as it is. As you have probably found out already and scratching your head now, how come Dell didn’t include Storage Wanring/Critical Assert Filter? For that question, you need to ask Michael Dell directly.

Btw, I am using iDRAC6, so not sure if your firmware contains such feature.

Method 3: How to get hardware failure alert with Dell IT Assistant (ITA)

This is actually today’s main topic I would like to focus on, it is the proper way to implement host alert via SNMP and SNMP Trap and it does provide a complete solution, but quite time-consuming and a bit difficult to setup. I tried to consolidate all the difficult part, eliminated all the unnecessary steps and use as much GUI as possible without going into CLI.

  1. Install ITA latest version which is 8.8 (while 8.9 is coming, but still not available for download). One thing you need to take care is to put the ITA network within the same management network of ESX Hosts or add a NIC that connects to the server network that need to be monitored.
  2. Install OSMA 6.3 or above (6.5 is on the way) on ESX 4.1 Hosts, as I found OSMA version 6.3 is already configured with some important necessary steps like SNMP trap setting to be used later.
  3. Edit the SNMP conf file under /etc/snmp/snmpd.conf, replace public with your own community_stringe.g. com2sec notConfigUser  default       public
  4. Restart the SNMPD service by /sbin/service snmpd restart.
  5. Enable SNMP Server under Security Profile using vSphere Client GUI, that will enable UPD Port 161 for receiving and UPD Port 162 for sending out SNMP Traps.
  6. Start to discover and inventory in ITA, you will find ESX hosts are added to Server Section. This completes the Pull side (ie, ITA Pull stuff from ESX Hosts), next we need to setup the Push side (ie, ESX Hosts Push alerts to ITA)
  7. Done? Not Yet, in order for ESX host to send snmp trap to ITA , you will need to specify the communities and trap targets with the command using VMware PowerCLI.

    vicfg-snmp.pl –server <hostname> –username <username> –password <password> -t <target hostname>@<port>/<community>

    For example, to send SNMP traps from the host esx_host_ip to port 162 on ita_ip using the ita_community_string, use the command:

    vicfg-snmp.pl –server esx_host_ip –username root –password password -t ita_ip@162/ita_community_string

    for multiple targets, use , to seperate the rest trap targets:

    vicfg-snmp.pl –server esx_host_ip –username root –password password -t ita_ip@162/ita_community_string, ita_ip2@162/ita_community_string

    To show and test if it’s working
    vicfg-snmp.pl –server esx_host_ip –username root –password password — show
    vicfg-snmp.pl –server esx_host_ip –username root –password password — test

  8. Remove all VM related alerts from Alert Categories under ITA, leaving ONLY vmwEnvHardwareEvent as I only want ITA to report EXS Host Server Hardware related warning or critical alerts. The reason is I found ESX sometimes generate many useless false alarms (e.g., “Virtual machine detects a loss in guest heartbeat”) regarding VM’s heardbeat which is related to VMTools installed in the VM.

itaRemember to enable UPD Port 162 on ITA server firewall. Simply treat ITA as a software device to receive SNMP Trap sent from various monitoring hosts.
Another thing is for Windows hosts to send out SNMP Trap, you will also need to go to SNMP Service under the Traps tab, configure the snmp trap ita_community_string and the IP address of the trap destination which should be the same as ita_ip.

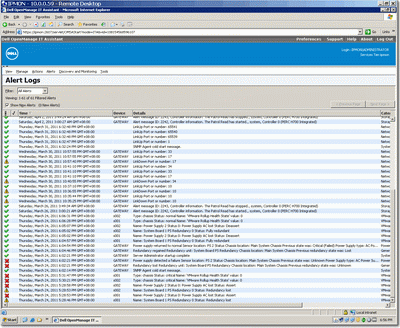
So I did a test by pulling one of the Power Supply on ESX Host, and I get the following alert results in my inbox.

From ITA:
Device:sXXX ip address, Service Tag: XXXXXXX, Asset Tag:, Date:03/22/11, Time:23:18:38:000, Severity:Warning, Message:Name: System Board 1 PS Redundancy 0 Status: Redundancy

From iDRAC:
Message: iDRAC Alert (s002)
Event: PS 2 Status: Power Supply sensor for PS 2, input lost was deasserted
Date/Time: Tue Mar 22 2011 23:26:18
Severity: Normal
Model: PowerEdge RXXX
Service Tag: XXXXXXX
BIOS version: 2.1.15
Hostname: sXXX
OS Name: VMware ESX 4.1.0 build-XXXXXXXX
iDrac version: 1.54

From vCenter:
Target: xxx.xxx.xxx.xxx Previous Status: Gray New Status: Yellow Alarm Definition: ([Event alarm expression: Hardware Health Changed; Status = Yellow] OR [Event alarm expression: Hardware Health Changed; Status = Red]) Event details: Health of Power changed from green to red.

What’s More

Actually there is Method 4 which uses Veeam Monitor (free version) to send email, but I haven’t got time to check that out, if you know how to do it, please drop me a line, thanks.

Finally, I would strongly suggest Dell to implement a trigger that will send out email alert directly from OpenManage itself, it’s simple and works for most of the SMB ESX Host scenario that contains less than 10 hosts in general, you can say this is Method Number 5.

Update Mar-24:
I got ITA working for PowerConnect switch as well, so my PowerConnect can now send SNMP trap back to ITA and generate an email if there is warning/critical issue, it’s really simple to setup PowerConnect’s SNMP community and SNMP trap setting, and I start to like ITA now, glad I am not longer struggling with DMC 2.0.

Finally, there is a very good document about setting up SNMP and SNMP Traps from Dell.

Update Aug-24:
If you are only interested to know if any of your server harddisk failed, then you can install LSI Megaraid Storage Manager which has the build-in email alert capability.

Thin Provisioning at BOTH Equallogic and ESX Level

By admin, March 21, 2011 12:42 pm

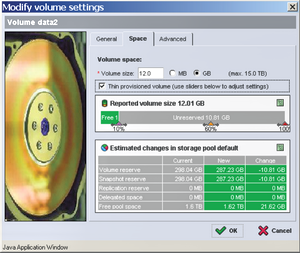
After several months of testing with real world loading, I would say the most optimized way to utilize your SAN storage is to enable Thin Provisioning at BOTH the Storage and Host.

  • By enabling Thin Provisioning on Equallogic, you will be able to create more volumes (or luns) for the connecting ESX hosts to use as VMFS or RDM space for the connecting VMs.
  • By enabling Thin Provisioning on ESX host, actually this is on VMFS to be exact, you will significantly gain VMFS space utilization and put more VMs on it, I was able to get at least 40 to 100% space saving on some of VMFS. It’s definitely great for service providers who always want to put those under-utilized VMs and group them together using Thin Provisioning.

thinproOne thing you need to constantly check is space will not grow over to 100%, you can do this by  enable vCenter Alarm on space utilization and stay alerted, I’ve encountered one time that a VM suddenly went crazy and ate all the space it allocated, thus tops VMFS threshold as well as Equallogic threshold at the same time. 

This is the only down side you need to consider, but the trade off is minimum considering the benefit you get when using Thin Provisioning at BOTH Equallogic and ESX Level.

Of course, you should not put a VM that constantly need more space over the time into the same thin provisioned volume with others.

Finally, not to mention it’s been proved by VMware that the performance penalty for using Thin Provisioning is almost none (ie, identical to thick format) and it’s amazing using VMFS is even faster than RDM in many cases, but that’s really another topic “Should I or Should I NOT use RDM”.

* Note: One very interesting point I found that is when enabling Thin Provisioning on storage side, but use Thick format for VM, guess what? The storage utilization ONLY shows what’s actually used within that VM, ie, if the thick format VM is 20GB, but only 10GB is actually used, then on thin provisioned storage side, it will show ONLY 10GB is allocated, not 20GB.

This is simply fantastic and intelligent! However, this still doesn’t help to over allocate the VMFS space, so you will still need to enable Thin Provisioning in each individual VM.

Sometimes, you may want to convert the original Thick to Thin by using vMotion the Datastore, another great tool without any downtime, especially if your storage support VAAI, then this conversion process only takes a few minutes to complete.

My view on the NEW VMware vCenter Operations

By admin, March 13, 2011 9:46 pm

After watching the demo of VMware vCenter Operations, I would say it’s just another monitoring and diagnostic tool besides the leading two: vfoglight from Vizioncore and Veeam Monitor from Veeam, nothing really special, but it does present the trouble ones in an intuitive way by using color icons.

vmware-vcenter-operations-1022x739px-440x318[1]

Personally, I found Veeam Monitor Free Edition is already more than enough to identify the problem and find out where the latency is, the key is to look at the lowest or deepest layer, in other words, into VM itself, as the problematic VM is the most fundamental element causing the contention on Resorucs pool, ESX Host, vCenter, etc.

Then I ask myself why would VMware release such product while there are already two great products in the market? Well, I will leave this question to you in the comment.

Update Apr 5

I’ve tried the Free Xangati for ESX and don’t like it, it’s not as intuitive as Veeam Monitor.

Dell Poweredge BIOS settings recommendation for VMware ESX/vSphere

By admin, March 5, 2011 5:15 pm

It’s a common question: “Are there any BIOS settings Dell recommends for VMware ESX/vSphere?” Primarily, Dell recommends reading and following VMware’s best practices. The latest revision (as of this posting) can be found in their article “Performance Best Practices for VMware vSphere™ 4.1”. Here are a list of additional points of interest specifically regarding Dell PowerEdge servers:

  • Hardware-Assisted Virtualization: As the VMware best practices state, this technology provides hardware-assisted CPU and MMU virtualization.
    In the Dell PowerEdge BIOS, this is known as “Virtualization Technology” under the “Processor Settings” screen. Depending upon server model, this may be Disabled by default. In order to utilize these technologies, Dell recommends setting this to Enabled.
  • Intel® Turbo Boost Technology and Hyper-Threading Technology: These technologies, known as “Turbo Mode” and “Logical Processor” respectively in the Dell BIOS under the “Processor Settings” screen, are recommended by VMware to be Enabled for applicable processors; this is the Dell factory default setting.
  • Non-Uniform Memory Access (NUMA): VMware states that in most cases, disabling “Node Interleaving” (which enables NUMA) provides the best performance, as the VMware kernel scheduler is NUMA-aware and optimizes memory accesses to the processor it belongs to. This is the Dell factory default.
  • Power Management: VMware states “For the highest performance, potentially at the expense of higher power consumption, set any BIOS power-saving options to high-performance mode.” In the Dell BIOS, this is accomplished by setting “Power Management” to Maximum Performance.
  • Integrated Devices: VMware states “Disable from within the BIOS any unneeded devices, such as serial and USB ports.” These devices can be turned off under the “Integrated Devices” screen within the Dell BIOS.
  • C1E: VMware recommends disabling the C1E halt state for multi-threaded, I/O latency sensitive workloads. This option is Enabled by default, and may be set to Disabled under the “Processor Settings” screen of the Dell BIOS. (I will keep the default to Enabled as I want to save more power in my data center and be enviornmental friendly)
  • Processor Prefetchers: Certain processor architectures may have additional options under the “Processor Settings” screen, such as Hardware Prefetcher, Adjacent Cache Line Prefetch, DCU Streamer Prefetcher, Data Reuse, DRAM Prefetcher, etc. The default settings for these options is Enabled, and in general, Dell does not recommend disabling them, as they typically improve performance. However, for very random, memory-intensive workloads, you can try disabling these settings to evaluate whether that may increase performance of your virtualized workloads.

Finally, in order to take the advantage of ESX 4.1 Power Management feature in vCenter to show up, you need to change the setting in BIOS Power Management to “OS Control”.

Equallogic PS Series Firmware Version V5.0.4 Released

By admin, March 2, 2011 12:36 pm

As usual, I would suggest to wait another 1-2 months before upgrading your EQL firmware since the latest firmware may always contain bugs.

Since none of the followings applies to my enviornment, so I will just skip this update completely. :)

Issues Corrected in this version (v5.0.4) are described below:

• Contention for internal resources could cause a controller failover to occur.

• In rare circumstances, after a communication problem between group members, a PS6000, PS6500, PS6010, or PS6510 member may become unresponsive or experience a controller failover.

• In some cases, a controller failover may occur during a drive firmware update that takes place while the array is in a period of low activity.

Drives may be incorrectly marked as failed. (happened mostly in PS4000 series)

• An invalid authentication failure may occur when using a RADIUS

• A hardware failure on the primary controller during a firmware update may inhibit failover to the secondary controller. server for CHAP authentication.

• Out-of-order network packets received by the array may cause retransmits.

• The array may not be able to clone a snapshot if the following scenario occurs: the parent volume was replicated to another group, the remote copy was promoted, and the changes were subsequently copied back to the original group using the Fast Failback process.

• Cannot clone snapshots of volumes with replicas that were promoted and subsequently failed back.

• Replication sometimes cannot be completed due to a problem with communication between the replication partners.

• In some cases, replication of a large amount of data may cause a shortage of internal resources, causing the GUI to become unresponsive.

• A network error may cause a failback operation to be unable to complete successfully, with the system issuing a “Replication partner cannot be reached” error.

• Exhausting the delegated space during replication may require that the in-process replica be cancelled in order to permit the volume to continue replicating as expected.

• A group running V5.0 firmware might be unable to perform management functions due to a lack of resources if a group running V3.3 firmware is replicating data to it.

• A restart of an internal management process could result in drives temporarily going offline in PS6010 and PS6510 systems.

Windows Server 2008 R2 SP1 & Veeam B&R automount problem

By admin, February 26, 2011 9:35 pm

I’ve encountered a problem when installing Windows Server 2008 R2 SP1 today and found the reason and solution pretty easy. It was due to Veeam B&R v5.0 automatically Disabled automount for SAN mode and W2K8 R2 SP1 requires automount to be enabled.

Solution:

1. Disconnect all active iSCSI connections and REMOVE the Target Portal from iSCSI favourite tab. 

2. From command prompt, issue the followings:
> diskpart
> automount enable

3. Reboot the server then go ahead and upgrade your W2K8 R2 with SP1, it will take about 50 minutes to complete, yes, it did take that long even on latest powerful server.

4. Then issue the following AFTER reboot:
> diskpart
> automount disable

5. Reboot the last time and then re-establish all previous iSCSI connections as usual.

Everything you need to know about VMware Infrastructure

By admin, February 5, 2011 10:05 pm

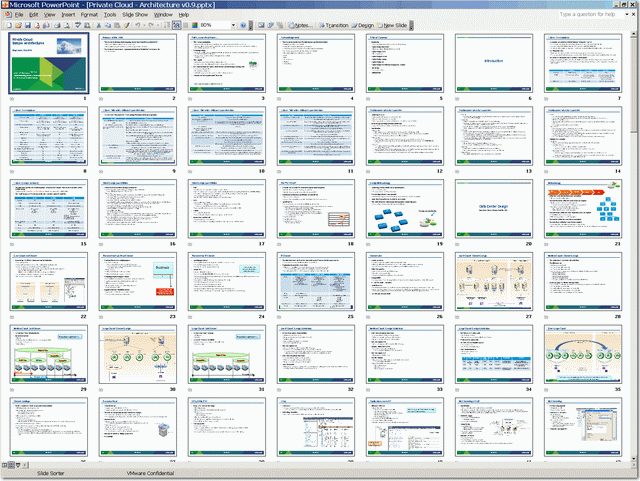
I just came across this GREAT PowerPoint presentation today, I wish I had it 6 months ago, it really helps you to clear the sky and understand many things before making the design and purchase decision.

vmw

VAAI got disabled during Storage vMotion and something about SIOC

By admin, February 4, 2011 4:10 pm

At first, I got very poor performance when I was trying to svMotion a 20GB VM within the same Equallogic SAN between different volumes, it took over 20 minutes to complete, I thought there must be something wrong as I’ve already enabled VAAI.

After searching the net and discovered the problem is due to Different Block Size between the two volumes (1MB vs 2MB) that will actually disabled VAAI feature. :(

So choosing the volumes with the same block size, I was able to reduce the time by almost 10 times!!!

See attached graph, 15:22 to 15:42 is the one without VAAI, 15:50 to 15:52 is the one with VAAI.

vaai

In additional, I have implemented Storage I/O Control today and found Storage vMotion with VAAI isn’t affected by SIOC as the whole svMotion is offloaded on to the EQL array, so SIOC won’t really kick in, you may say svMotion with VAAI is “Out of Control ”, this is another great thing about VAAI!

Finally, I do think SIOC is one of the best feature in ESX 4.1 for many cloud hosting providers as they can finally meet their storage SLA now besides the CPU and memory.

Pages: Prev 1 2 3 4 5 6 7 ...12 13 14 15 16 17 18 Next