Category: Others (其它)

Null Route DDOS attack on Windows Platform

By admin, February 22, 2012 7:30 pm

This little trick only works for entry level hacker, it won’t stand a chance with advanced hacker, not to mention those DDOS with pure bandwidth consumption (I don’t think there is a way to mitigate this at all anyway, if you do, pls drop me a line).

First I tried the following intuitive command on Windows Server 2003 and found out it doesn’t work, somehow, Windows doesn’t allow route to 127.0.0.1.

route add DDOS_IP 255.255.255.255 127.0.0.1

* Assume DDOS_IP is the DDOS source IP Address.

The solution is to create a loopback (ie, fake) NIC by go to Control Panel, then Add Hardware > Network Card > Microsoft Loopback Adapter.

From Properties, Remove everything and leaving only TCP/IP, assign it a fake IP (say 192.168.80.8), disable WINS of course.

Finally, simply route the crap to this fake destination

route add DDOS_IP MASK 255.255.255.255 192.168.80.8

If you want to permanently add this DDOS IP, use route add –p parameter.

To remove it, type “route delete DDOS_IP”.

In additional, if you want to block the whole C-Class (ie, 256 IPs, mask /24) of DDOS source, then use:

route add DDOS_IP MASK 255.255.255.0 192.168.80.8

For example: route add 202.128.110.0 MASK 255.255.255.0 192.168.80.8

Finally, how do you know which IP is DDOS your server? Well, if you find a IP with many LAST_ACK from netstat, then this indicates a very high possibility that the IP is the DDOS attacker.

Examples

To display the entire contents of the IP routing table, type:

route print

To display the routes in the IP routing table that begin with 10., type:

route print 10.*

To add a default route with the default gateway address of 192.168.12.1, type:

route add 0.0.0.0 mask 0.0.0.0 192.168.12.1

To add a route to the destination 10.41.0.0 with the subnet mask of 255.255.0.0 and the next hop address of 10.27.0.1, type:

route add 10.41.0.0 mask 255.255.0.0 10.27.0.1

To add a persistent route to the destination 10.41.0.0 with the subnet mask of 255.255.0.0 and the next hop address of 10.27.0.1, type:

route -p add 10.41.0.0 mask 255.255.0.0 10.27.0.1

To add a route to the destination 10.41.0.0 with the subnet mask of 255.255.0.0, the next hop address of 10.27.0.1, and the cost metric of 7, type:

route add 10.41.0.0 mask 255.255.0.0 10.27.0.1 metric 7

To add a route to the destination 10.41.0.0 with the subnet mask of 255.255.0.0, the next hop address of 10.27.0.1, and using the interface index 0×3, type:

route add 10.41.0.0 mask 255.255.0.0 10.27.0.1 if 0×3

To delete the route to the destination 10.41.0.0 with the subnet mask of 255.255.0.0, type:

route delete 10.41.0.0 mask 255.255.0.0

To delete all routes in the IP routing table that begin with 10., type:

route delete 10.*

To change the next hop address of the route with the destination of 10.41.0.0 and the subnet mask of 255.255.0.0 from 10.27.0.1 to 10.27.0.25, type:

route change 10.41.0.0 mask 255.255.0.0 10.27.0.25

Latest HP ProLiant DL380 (Generation 8)

By admin, February 18, 2012 10:06 pm

The demo does look a lot like a transformer in action, it’s so cool!

Oh…it’s the world’s 1st server with PCIe 3.0 (1GB/s bandwidth?) and DL380 surprised me with a newly designed nice looking bezel (finally!), but it looks like a Poweredge now. :)

That’s why I love the latest innovative network, server and storage technologies, they have always been my biggest hobby and toy, so much fun to learn and play with.

Happy Valentine’s Day 2012

By admin, February 15, 2012 1:31 pm

For you only, our 13th Valentine’s Day!

IMG_6421

Samsung DDR3 Low Voltage ECC RDIMM and DDR UDIMM

By admin, December 29, 2011 7:47 pm

Previously I’ve mentioned the followings regarding the latest DDR3L RAM:

It’s nice to have that 20% electricity saving, but when you add 2DPC (2 DIMMs Per Channel), your nice 20% power saving (ie, 1.35V) will be disabled automatically (ie, raise to 1.5V instead). However the good part is you still get that 1333Mhz bandwidth with 2DPC. DDR3L 1.35V will only apply when it’s in 1DPC mode.

What I’ve found out today during the server upgrade is the above may not be always true.

May be it’s related to the Poweredge BIOS that I’ve updated sometimes ago as it may contain the changes now allowing 2DPC operating at 1.35V Low Voltage. (may be even 3DPC)

The server is Poweredge R610 with 1 CPU Xeon E5620 (32nm, 12M Cache, 2.40 GHz, 5.86 GT/s, max supports DDR3-1066). After I filled up all the available 6 DIMMS, (ie, 3 Channels, 2 DIMMS per channel), I saw during the rebooting screen, it showed DDR- 1066Mhz and 1.35V, This is Great! I was expecting to see 1.5V as this happens to my R710 when putting 2DPC, it automatically raised to 1.5V, probably will go down to 1.35v if I upgraded the BIOS for that R710.

Finally, I located this interesting White Paper about Samsung’s DDR3L RAM, the result shows even with 3DPC at 1.5V, you can still save up to 50% of the total power consumption by using DDR3 Low Voltage RAM. There are also many other interesting technical insides regarding the benefits using DDR3L RAM.


The other thing is the RAM Upgrade KIT somehow did’t come with Heatsink, strange.

IMG_6328

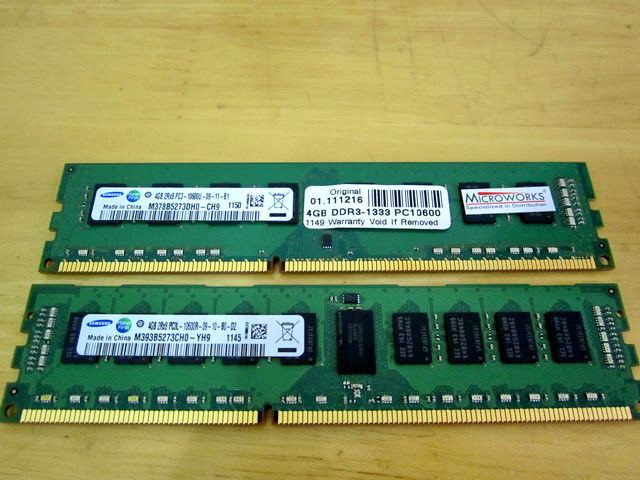
What you are seeing in the above picture is a direct comparision of two ALMOST IDENTICAL 4GB RAM, even the IC chipset part number is almost identical except a single character difference. 

The one on top is used in Desktop (Optiplex 990 SSF), I bought it in a local computer shop for under USD20, and the other is for this server upgrade (ie, Poweredge R610).

As you can see there are two extra chips in server ram (hence ECC and Buffer), and note the “L” indicates this server RAM is a Low Voltage version.

IMG_6329

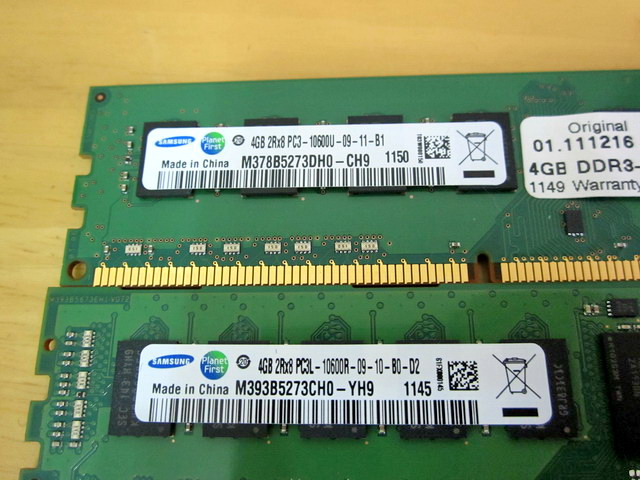
I also noticed the desktop ram label says it’s 10600U and server one says 10600R, ha…here is the fun part, I am sure this means U-DIMM (as Un-Buffered) and R-DIMM (as Registered & Buffered), so what does it mean or why this is so important?

Well, technically you can fit a cheap U-DIMM (about USD20 per 4GB DIMM)  into any Poweredge R2xx, R6xx, R7xx, R8xx, R9xx, of course, there is a limit when using U-DIMM, maximum you can use is 24GB, so that’s about 6 DIMMS x 4GB U-DIMM.

And the saving is Huge, for some may be (as USD120 for U-DIMM vs USD420 for R-DIMM), that’s USD20 for a 4GB U-DIMM that you can buy from any local computer shop as they are simply a desktop RAM, comparing to USD70 for the equivalent R-DIMM.

Of course, I will still choose R-DIMM, you may ask for maximum 24GB, why pay that extra  USD300-315 for ECC Reg RAM?  Well…RAS and reliability is the number  one factor in data center business, and not to mention the expandability, so Why NOT?

Shrinking a Equallogic Thin Volume = Thin Reclaim on Dirty Blocks

By admin, December 22, 2011 10:28 pm

I thought it’s only available in FW 5.1 with ESX 5.0 or above (in fact, it turns out this EQL feature is not even ready yet till Q2/Q3 2012), and I am surprised to find out the following today somewhere on-line.

Still I do not have the courage to do this  in my production, it’s just too scary, better just Storage VMotion from one datastore (ie, EQL volume) to another datastore and then remove the old dirty volume to claim space.

Shrinking is only supported in EqualLogic firmware version 3.2.x or greater. Shrinking a Thin Provisioned volume is only supported in V4 or higher. For v3.2, you can however, convert a TP volume to a standard thick volume and then resize it, assuming there is space available to do so.

CAUTION: Improperly shrinking a filesystem can result in data loss. Be very careful about shrinking volumes, and always create snapshots to fall back to in the event of a problem.

To shrink a volume you must first shrink the file system and partition. While there are a few Operating Systems, like Windows 2008 for example, which support this natively, most do not. For Windows NT, 9x,XP, W2K3, you need to use a tool such as partition magic, partition commander, or similar tool. We do not test these tools in house, so we cannot make any statements about how well they work.

WARNING: be certain that you are shrinking the volume to slightly larger than what you have reduced the filesystem/partition size to. Shrinking a volume to be smaller than the partition/filesystem “WILL” result in data loss, i.e., if you reduced the filesystem to 500G, shrink the EQL volume to 501GB.

Always create a snapshot before attempting any resize operation. Shrink the file system & partition slightly more than you intend to shrink the volume to avoid rounding or other math discrepancies.

The volume will need to be offline to shrink the volume, og off or shutdown the server(s) connected to that volume first.

The Shrink command is a CLI only option. You have to first select the volume (covered in the CLI manual available on the FW download page).

GrpName> vol sel
GrpName(volume_volume_name)> offline
GrpName(volume_volume_name)> shrink
GrpName(volume_volume_name)> online

Another Great FREE Tool from Solarwind: Storage Response Time Monitor

By admin, December 22, 2011 9:47 am

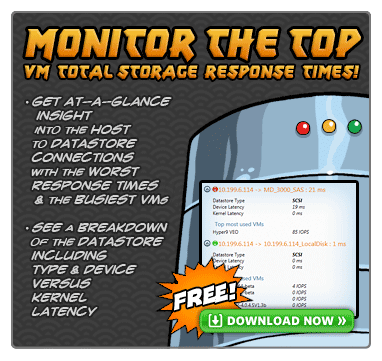
Just found Storage Response Time Monitor 10 mins ago, downloaded and installed it and love it at the first sight! It correctly shows me the real-time break down of each Equallogic volume  latency and what’s more, it lists the top 5 BUSIEST VMs with IOPS number for that particular volume in one single window.

Having trouble with storage latency issues? Seeing your response times getting slower and slower? Download SolarWinds Storage Response Time Monitor and start tracking those sluggish VMs. Storage Response Time Monitor shows the top host to datastore total response times and a count of additional high latency offenders. Keeping track of your storage response times has never been easier.

Storage Response Time Monitor Highlights:

  • Get at-a-glance insight into host to datastore connections with the worst response times, and the busiest VMs using those connections
  • See a breakdown of the datastore including type and device versus kernel latency

overview_free-storage-respo

Equallogic Versus Lefthand Blog

By admin, December 22, 2011 9:32 am

Amazing, someone actually made such an interesting blog collecting all the related articles he could find on the net, listing out all the pros & cons of each vendor, for me, of course I bias towards  Equallogic, but it’s nice to see such in depth comparison.

What a BIG Surprise! Equallogic FW 5.1 VMware’s Thin Provision Stunning feature WORKED on ESX 4.1!

By admin, December 21, 2011 10:21 pm

This happened two days ago and followed by a very happy ending.

Around 8AM, I received an SMS alert saying one of the email server isn’t responding, then it followed with many emergency calls from clients on that email server  (obvious…haha).

I logged into vCenter and found the email server had a question mark on top of its icon, shortly I realized the EQL volume it sits on is full as SANHQ also generated a few warning as well the previous days, but I was too busy and too over confident to ignore all the warnings and thinking it may get through over the weekend.

The solution is quite simply. First increase the Thin Provisioned EQL volume size, then extend the existing volume in vCenter, next simply answer the question on the stunned (ie, suspended) VM to Retry again, Woola, it’s back to normal again, no need to restart or shutdown the VM at all.

This is really beautiful! I was a bit depressed when knowing it will only work with ESX 5.0 previously and this was also confirmed by a Dell storage expert, then found out the The VMware’s Thin Provision Stunning feature will work with ESX 4.1 again the other day from Dell’s official document, I was completely confused as I do not know who’s right until two days ago.

FYI, I had a nasty EQL Thin Provisioned volume issue last year (EQL firmware was 4.2), the whole over-provisioned thin volume simply went offline when it reached the maximum limit and all my VMs on that volume crashed and need to restart manually even after extending the volume in EQL and vCenter.

No more worries, thank you so much Equallogic, you really made my day! :)

Finally, some those who may be interested to know why I didn’t upgrade to ESX 5.0? Why? Why should I? Normally I will wait for a major release like ESX 3.5 or ESX 4.1 before making the big move.

There is another issue as the latest Veeam Back & Replication 6.0 still have many minor problems with ESX 5.0 and frankly speaking, I don’t see many advantage moving to ESX 5.0 while my ESX 4.1 environment is so rocket solid. The new features such as Storage DRS, SSD caching or VSSA are all minor stuffs comparing with VAAI and iSCSI multipathing, thin provisioning in ESX 4.1. In additional, the latest EQL firmware features always mostly backward compatible with older ESX version, so that’s why I still prefer to stay at ESX 4.1 at least for another year.

Oh…one thing I missed that is I really do hope EQL firmware 5.1 Thin Reclaim can work on ESX 4.1, but it seemed it’s a mission impossible, never mind, I’ve got plenty of space, moving a VM off a dirty volume isn’t exactly a big deal, so I can live with it and manually create a new clean volume.

Update Jan 17, 2012

Today, I received the latest Equallogic Newsletter and it somehow also indicates this VMware Thin Provisioning Stun feature is supported with ESX 4.1, hope it’s not a typo.

Dell EqualLogic Firmware Maintenance Release v5.1.2 (October 2011)

Dell EqualLogic Firmware v5.1.2 is a maintenance release on the v5.1 release stream. Firmware v5.1 release stream introduces support for Dell EqualLogic FS7500 Unified Storage Solution, and advanced features like Enhanced Load Balancing, Data Center Bridging, VMware Thin Provisioning awareness for vSphere v4.1, Auditing of Administrative and Active Directory Integration. Firmware v5.1.2 is a maintenance release with bug fixes for enhanced stability and performance of EqualLogic SAN.

Update Mar 5, 2012

I found something new today that Thin Provisioning Stun is actually a hidden API in ESX 4.1 and apparently there are only two storage vendors support it in ESX 4.1, one being Equallogic, no wonder this feature worked even with firmware v5.0.2, as I thought at least v5.1 is required. Thanks EQL, so this gives me a bit more time to upgrade to FW5.1 or even FW5.2.

Thin Provisioning Stun is officially a vSphere 5 VAAI primitive. It was included in vSphere 4.1 and some array plugins support it, but it was never officially listed as a vSphere 4 primitive.

Out of Space Condition (AKA Thin Provisioning Stun)

Running out of capacity is a catastrophe, but it’s easy to ignore the alerts in vCenter until it’s too late. This command allows the array to notify vCenter to “stun” (suspend) all virtual machines on a LUN that is running out of space due to thin provisioning over-commit. This is the “secret” fourth primitive that wasn’t officially acknowledged until vSphere 5 but apparently existed before. In vSphere 5, this works for both block and NFS storage. Signals are sent using SCSI “Check Condition” operations.

VAAI Commands in vSphere 4.1

esxcli corestorage device list

esxcli vaai device list

esxcli corestorage plugin list

AMD Opteron 6200: 16 Cores, 1600 DDR3 4 Channels and Turbo Core

By admin, December 11, 2011 3:56 pm

amd

So who’s the Copy Cat? It’s hard to tell really over the past 20 years. It was Intel copied AMD’s HT and renamed it as QuickPath Interconnect (QPI), now it’s AMD’s turn to copy Intel’s Turbo Boost and renamed it as Turbo Core. Chinese has an old saying “天下文章一大抄”  described this perfectly.

The good thing is Opteron 6200 can fit nicely in the existing G34 socket with a simple upgrade in server BIOS. However, Intel’s coming E5 Xeon requires a different socket as it’s the Tick in the product map, too bad for existing Dell R710 or HP Proliant G7 customers.

Oh…it seemed to me that the latest Bulldozer is STILL a “Fake” 16 cores die as it is still a 2 x 8 cores die.


 AMD搶推全球第一款16核心伺服器等級處理器

伺服器級處理器核心數創新高,AMD搶推全球首款16核心處理器,使單臺4路伺服器上看64核心,同時也將封裝了雙整數運算核心的Bulldozer架構引進伺服器市場

AMD推出首款16核心伺服器級處理器Opteron 6200系列,將32奈米Bulldozer架構處理器引進商用伺服器市場。

處理器廠商AMD推出全球首款16核心伺服器級處理器Opteron 6200系列(代號為Interlagos),為目前業界擁有最多核心數的伺服器級處理器,也是AMD的Bulldozer架構首度進軍伺服器市場。

AMD表示,這系列處理器的運算效能比前款Opteron 6100系列處理器(代號為Magny-Cours)提升3成,延續採用了6100使用的G34伺服器插槽,企業既有伺服器只要更新BIOS程式後,就能改用新款處理器提高運算效能。多家伺服器廠商也陸續推出搭載16核心Opteron處理器的伺服器產品,使單臺4路伺服器上看64核心。

單顆處理器上看16核心

今年10月初,AMD先推出採Bulldozer架構的桌上型電腦處理器FX系列,最多為8核心,打破桌上型電腦的核心數記錄。1個多月後,Bulldozer架構處理器進入商用伺服器市場,AMD推出全球首款16核心伺服器級處理器 Opteron 6200系列,相當於內建8個Bulldozer模組,採用32奈米製程,主要用於2或4路伺服器。

臺灣AMD資深產品經理賴榮安表示,相較於最多12核心的6100處理器,6200系列的運算能力提升將近3成,主要原因是處理器架構轉換為Bulldozer之後,核心數增多、最大記憶體規格從1,333 MHz 的DDR3轉而支援1,600MHz的DDR3記憶體,也新增Turbo Core自動超頻技術等。

Turbo Core技術類似英特爾Turbo Boost技術,同樣能提高處理器的時脈。不同之處是,Turbo Core技術提供了2種超頻模式,第一種可將處理器全部核心的時脈提升約300MHz~500MHz,第二種可選擇只將處理器半數的核心轉換為閒置狀態,另外半數核心的時脈提升約1GHz。

Opteron 6200全系列共10款,除了16核心,還提供4、8、12核心版本,時脈介於1.6GHz至2.6GHz。啟用Turbo Core技術後,時脈最多可達到2.9GHz至3.7GHz。處理器功耗介於85至140瓦。

在快取記憶體的配置上,每顆核心擁有自己的第一階快取,組成1個Bulldozer模組的2顆整數運算核心共享2MB的第二階快取,而每4個Bulldozer模組則共享16MB的第三階快取。每個處理器最多支援4條記憶體通道。

在作業系統的支援度方面,像是Red Hat Enterprise Linux 5.7與6.1、SUSE Linux Enterprise Server 10 SP4與11 SP1、微軟Windows Server 2008 R2 SP1等都可支援Bulldozer架構處理器。不過,部分舊版本的作業系統不能支援新款處理器。例如,Linux作業系統核心2.6.31版及以下版本、Windows Server 2003 R2 SP2版本以下、Red Hat Enterprise Linux 4.x~6.0版等都難以支援Bulldozer架構處理器。

由於6100系列與6200系列都採用G34伺服器插槽,所以,企業現有搭載6100系列處理器的伺服器在硬體架構上不需要太多調整,只要安裝伺服器廠商提供的新版BIOS,經過調校就能改搭載6200系列處理器。目前HP、IBM、Dell、Acer、泰安與Cray已陸續推出相關伺服器產品,鎖定網站服務、資料庫、伺服器虛擬化、高效能運算(HPC)等應用。多家廠商表示,轉換到6200系列的伺服器產品價格多數維持不變,有些甚至還調降,但多數廠商不公布新規格產品的價格。

賴榮安表示,現在臺灣已有企業正在測試新款處理器。在國外,像美國國家科學基金會(NSF)位於伊利諾州的超級電腦應用中心(NCSA)宣布,將採用6200系列處理器來建置Blue Waters超級電腦。


明年推Opteron 3000系列新產品線,攻占微型伺服器市場

另外,針對低耗電的企業應用,AMD還推出6或8核心伺服器級處理器Opteron 4200系列(代號為Valencia),可用於2路以下伺服器產品,採用32奈米製程與C32插槽。

4200系列增加了核心數與處理器時脈,第三階快取為8MB,時脈介於1.6GHz至3.0GHz,透過Turbo Core自動超頻技術,時脈可達到2.8GHz至3.7GHz,開始支援DDR3-1600 MHz記憶體規格。

不過,鎖定低耗電應用的4200系列,熱設計的功耗介於35至95瓦,沒有比4100系列更少,也比不過英特爾Xeon E3-1220L僅20瓦的熱設計功耗。

到了2012年上半年,AMD才會針對低耗電應用,推出新的伺服器處理器產品線Opteron 3000系列(代號為Zurich),首款為4至8核心,採用Bulldozer架構與AM3+插槽,鎖定高密度及低耗電的1路主機代管伺服器、網路伺服器及微型伺服器等雲端供應商的應用環境。

Bulldozer架構處理器核心設計大不同

AMD Bulldozer架構處理器的核心設計與舊款Opteron 6100系列與4100系列不同。舊款處理器的單一個核心包含1個整數運算核心與1個浮點運算核心,並具備獨立的L2快取,而英特爾處理器內單一個核心的設計,同樣包含1個整數運算核心與1個浮點運算核心,並具備獨立的L2快取,所以英特爾最高階伺服器級處理器Xeon E7具備10核心,總共包含10個整數運算核心與10個浮點運算核心。
但是,Bulldozer架構調整了處理器的核心設計,透過共享快取與浮點運算核心的方式,來增加整數運算核心的總數。以16核心Opteron 6200系列來說,單顆處理器包含8個Bulldozer模組,每1個Bulldozer模組都封裝了2個整數運算核心,每2個核心共享L2快取及1個浮點運算核心,每4個Bulldozer模組再共享L3快取,單顆處理器內含16顆核心。

採用AMD Opteron 6200系列的伺服器

 
HP ProLiant

型號   組態 機箱 記憶體插槽數
DL165 G7 1路 1U 24 DIMMs
DL385 G7 2路 2U 24 DIMMs
DL585 G7 4路 4U 48 DIMMs
BL465c G7 2路 刀鋒 16 DIMMs
BL685c G7 4路 刀鋒 32 DIMMs

泰安

型號   組態 機箱 記憶體插槽數
YR190-B8028-X2 1路 1U 12 DIMMs
YR190-B8238-X2 2路 1U 12 DIMMs
GT24-B8236/ GT24-B8236-IL 2路 1U 16 DIMMs
GN70-B8236-HE/ GN70-B8236-HE-IL 2路 2U 16 DIMMs
FT48-B8812 4路 4U 32 DIMMs

Acer

型號   組態 機箱 記憶體插槽數
AW2000h-AW175hq F1 2路 2U 16 DIMMs
AR 385 F1 2路 2U 24 DIMMs
AR 585 F1 4路 2U 48 DIMMs

IBM System x

型號   組態 機箱 記憶體插槽數
x3755 M3 2路 2U 32 DIMMs

Dell PowerEdge

型號   組態 機箱 記憶體插槽數
R715 2路 2U 16 DIMMs
R815 4路 2U 32 DIMMs
M915 4路 刀鋒 32 DIMMs
C6145 4路 2U 32 DIMMs

SuperMicro SuperServer 

型號   組態 機箱 記憶體插槽數
1042G-TF 4路 1U 32 DIMMs
1122GG-TF 2路 1U 16 DIMMs
1012G-MTF 1路 1U 8 DIMMs
1022GG-TF/1022G-NTF/ 1022G-URF   2路 1U 16 DIMMs
2022G-URF 2路 2U 16 DIMMs
2022G-URF4 2路 2U 24 DIMMs
2042G-6RF/2042G-TRF 4路 2U 32 DIMMs
2022TG-HIBQRF 2路 2U 16 DIMMs
2022TG-HLTRF/ 2022TG-HLIBQRF 2路 2U 8 DIMMs
2122TG-HIBQRF/ 2122TG-HTRF 2路 2U 16 DIMMs
4022G-6F 2路 直立 16 DIMMs
4042G-TRF/4042G-6RF 4路 直立 32 DIMMs
SBA-7222G-T2 2路 刀鋒 8 DIMMs
SBA-7142G-T4 4路 刀鋒 16 DIMMs

Storage I/O Control (SIOC) Causing VM to Fail

By admin, December 9, 2011 12:53 am

Recently, I encountered a strange situation that sharp at 2am which is the backup window (Acronis agent running inside VM), one of the VM failed to function on occasion, I have to reboot it in order to RTO. CPU on the VM went to 100% for a few hours and became non-responsive to ping gradually.

However I am still able to login to console, but cannot launch any program, reboot is ok though.

There are tons of Red Alert Error under Event Log (System), most of them are related to I/O problem, seemed harddisk on EQL SAN is having bad block or so.


Event ID: 333
An I/O operation initiated by the Registry failed unrecoverable. The Registry could not read in, or write out, or flush, one of the files that contain the system’s image of the Registry.

Event ID: 2019
The server was unable to allocate from the system nonpaged pool because the pool was empty.

Event ID: 50
{Delayed Write Failed} Windows was unable to save all the data for the file . The data has been lost. This error may be caused by a failure of your computer hardware or network connection. Please try to save this file elsewhere.

Event ID: 57
The system failed to flush data to the transaction log. Corruption may occur.
I couldn’t’ find the exact reason during the preliminary investigation and email exchange with EQL technical support returns nothing.

Event ID: 2019
Unable to read the disk performance information from the system. Disk performance counters must be enabled for at least one physical disk or logical volume in order for these counters to appear. Disk performance counters can be enabled by using the Hardware Device Manager property pages. The status code returned is in the first DWORD in the Data section.

Then suddenly I found there is an vCenter alert saying there is a non-direct storage congestion on the volume where the VM locates. Right away I figured out it’s related to SIOC, checked the IO latency during 2AM confirmed this. It’s the SIOC throttled back  (over 30ms) or forcing the volume to use less latency during the backup windows, so this cause the backup software (Acronis) and Windows somehow crashed.

I’ve disabled SIOC on that particular volume for 3 days already, everything runs smooth so far, it seemed I have solved the mystery.

If you have encountered something like this, please do drop me a line, thanks!

Update: Dec 23, 2011

The same problem occurred again, so it’s definitely not related to SIOC. Funny thing is it happened on the same  time when scheduled antivirus and Acronis backup windows started together. So I’ve changed the Acronis backup windows to a later time  because I think these two I/O  intensive programs were competing with each other.

I do hope this is the root of the problem and will observe more.

Update: Jan 14, 2012

I think I’ve nailed the problem finally, no more crash since Dec 23, 2011. Last night I observed a very interesting fact that the VM CPU went to 90% at 2am and last for 15 mins. ah…I realized it’s the weekly scheduled virus scanning that’s causing huge I/O and latency, it even some of the service on this VM stopped responding during the busy time.

So I’ve decided to remove the weekly scan completely, it’s useless anyway.

Update: Jan 18, 2013

The above procedure (removed weekly scheduled virus scanning) does prove it’s the cause of the problem after all.

Pages: Prev 1 2 3 4 5 6 7 ...69 70 71 ...102 103 104 Next